Dockerise deepfake detection Django application using Nvidia Cuda
Installing a CUDA-based application is never simple, one has to face many dependency issues. After receiving many queries of issues on LinkedIn I finally dockerized the deepfake detection Django application to make the life of many developers easy.
Today I will be telling you how you can build your own docker image using the different model with Nvidia Cuda GPU.
You can find the source code on Github. The challenging part of this application is that it uses Nvidia CUDA technology which comes only with Nvidia GPU, so if you don't have a compatible Nvidia GPU then things will not work for you.
Let's get started.
First of all we will be dockerizing the application in the production mode and we need to note that Django serves static files in development and production. In production i.e DEBUG = False Django doesn't server static files automatically we need a webserver to serve the static files.
So today we will be using the Nginx server for reverse proxy and gunicorn for serving requests to Django.
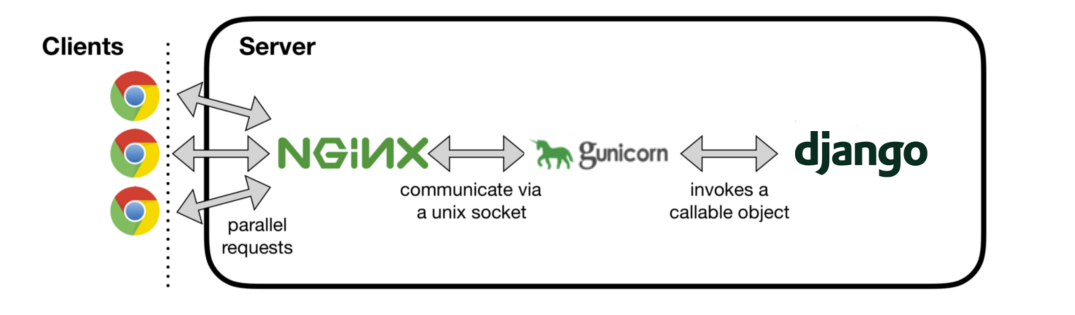
Also, we will be using normal DockerFile instead of using docker-compose because we will be using multiple docker images for a single container and this is not possible to achieve via docker-compose. Our Nginx will be communicating with gunicorn using the UNIX socket connections.
Now the very first step is to add some things in the Settings.py file of the django project.
# SECURITY WARNING: don't run with debug turned on in production!
DEBUG = False# Change and set this to correct IP/Domain
ALLOWED_HOSTS = ["*"]#used in production to serve static files
STATIC_ROOT = "/home/app/staticfiles/"
We set debug to false to mimic the production and set the allowed_host to *, allowed host can be set to the IP of the container but for now to make things simple we will set it to * which means all requests from any IP and at the end we have added the static root which means from which location all the static files are located.
Note: If you want to build the docker image with other frames model like 40,60,80,100 frames then place all the models in the django models folder.
Further, we will take look at the Dockerfile of Django app.
#pull the nvidia cuda GPU docker image
FROM nvidia/cuda#pull python 3.6.8 docker image
FROM python:3.6.8ENV PYTHONDONTWRITEBYTECODE 1ENV PYTHONUNBUFFERED 1#create a directory to serve static filesRUN mkdir -p /home/app/staticfiles/app/uploaded_videos/WORKDIR /appCOPY ./requirements.txt /app/requirements.txtRUN python -m pip install --upgrade pipRUN pip install cmakeRUN pip install opencv-python==4.2.0.32RUN pip install -r requirements.txtCOPY . /appRUN python manage.py collectstatic --noinputRUN pip install gunicornRUN mkdir -p /app/uploaded_videos/app/uploaded_videos/VOLUME /app/run/ENTRYPOINT ["/app/bin/gunicorn_start.sh"]
In the above file, we are pulling the Nvidia Cuda docker image and Python 3.6.8 docker image into single container and copying our files to /app directory in the container and we are creating sime directories to host the static and media files. We ate mounting the volume at /app/run, for here the unix socker connection will communicate with the Nginx container. In the end, we have added a bash script to start the gunicorn server.
#!/bin/bash
NAME="project_settings"         # Name of the applicationDJANGODIR=/app             # Django project directory# we will communicte using this unix socket
SOCKFILE=/app/run/gunicorn.sock  NUM_WORKERS=3    # how many worker processes should Gunicorn spawn# which settings file should Django use
DJANGO_SETTINGS_MODULE=project_settings.settingsDJANGO_WSGI_MODULE=project_settings.wsgi        # WSGI module nameecho "Starting $NAME as `whoami`"# Create the run directory if it doesn't exist
RUNDIR=$(dirname $SOCKFILE)
test -d $RUNDIR || mkdir -p $RUNDIR# Start your Django Gunicorn
gunicorn project_settings.wsgi:application --bind=unix:$SOCKFILE --workers $NUM_WORKERS --timeout 600
Now it's time to build the docker image. Before building make sure you have deleted all the static and media files to ensure a lightweight image,
docker build . -t deefakedetectiondockerimageAfter building the docker image now it's time to run the image. Since we have to run the image to make sure the container access the GPU of the host machine we will use the below command to run.
docker run --rm --gpus all -v static_volume:/home/app/staticfiles/ -v media_volume:/app/uploaded_videos/ --name=deepfakeapplication deefakedetection20framemodelIn the above command we have attached the static_volume and media_volument to our container. Please make sure you note down the — name of the container as this will be passed to Nginx for enabling Unix socket connections.
Now its time to build the Nginx image:
#nginx DockerFileFROM nginxWORKDIR /etc/nginx/RUN rm /etc/nginx/conf.d/default.confCOPY nginx.conf /etc/nginx/conf.dEXPOSE 80
We are pulling the Nginx docker image from the repo and deleting the default config and placing out below config file in place of that.
upstream project_settings {
    server unix:/app/run/gunicorn.sock
    fail_timeout=0;
}server {listen 80;
    # disable any limits to avoid HTTP 413 for large image uploads
    client_max_body_size 0;location / {
        if (!-f $request_filename) {
            proxy_pass http://project_settings;
            break;
        }
        proxy_set_header X-Forwarded-For $proxy_add_x_forwarded_for;
        proxy_set_header Host $host;
        proxy_redirect off;
    }
    #static file directory
    location /static/ {
        alias /home/app/staticfiles/;
    }
    #media file directory
    location /media/ {
        alias   /app/uploaded_videos/;
    }
}
Now let's build the Nginx image
docker build . -t deepfakenginxproxyserverAfter the build is complete run the Nginx container
docker run -p 80:80 --volumes-from deepfakeapplication -v static_volume:/home/app/staticfiles/ -v media_volume:/app/uploaded_videos/ deepfakenginxproxyserverWe are attaching the volumes from the Django app to the Nginx container so the Nginx can access the static files directories.
Now it's all done you can view the application running at http://localhost:80/
If you face any issues feel free to reach out to me and don't forget to follow me.